[fusion_builder_container hundred_percent=”no” equal_height_columns=”no” menu_anchor=”” hide_on_mobile=”small-visibility,medium-visibility,large-visibility” class=”” id=”” background_color=”” background_image=”” background_position=”center center” background_repeat=”no-repeat” fade=”no” background_parallax=”none” parallax_speed=”0.3″ video_mp4=”” video_webm=”” video_ogv=”” video_url=”” video_aspect_ratio=”16:9″ video_loop=”yes” video_mute=”yes” overlay_color=”” video_preview_image=”” border_color=”” border_style=”solid” padding_top=”” padding_bottom=”” padding_left=”” padding_right=”” type=”legacy”][fusion_builder_row][fusion_builder_column type=”1_1″ layout=”1_1″ background_position=”left top” background_color=”” border_color=”” border_style=”solid” border_position=”all” spacing=”yes” background_image=”” background_repeat=”no-repeat” padding_top=”” padding_right=”” padding_bottom=”” padding_left=”” margin_top=”0px” margin_bottom=”0px” class=”” id=”” animation_type=”” animation_speed=”0.3″ animation_direction=”left” hide_on_mobile=”small-visibility,medium-visibility,large-visibility” center_content=”no” last=”true” min_height=”” hover_type=”none” link=”” border_sizes_top=”” border_sizes_bottom=”” border_sizes_left=”” border_sizes_right=”” first=”true”][fusion_text]
안녕하세요. 흐린하늘입니다.
이번 강좌는 지난 강좌에 이어 워드프레스 테마설치 두번째 버전입니다.
[/fusion_text][/fusion_builder_column][/fusion_builder_row][/fusion_builder_container][fusion_builder_container hundred_percent=”yes” overflow=”visible” type=”legacy”][fusion_builder_row][fusion_builder_column type=”1_1″ layout=”1_1″ background_position=”left top” background_color=”” border_color=”” border_style=”solid” spacing=”yes” background_image=”” background_repeat=”no-repeat” padding_top=”” padding_right=”” padding_bottom=”” padding_left=”” margin_top=”0px” margin_bottom=”0px” class=”” id=”” animation_type=”” animation_speed=”0.3″ animation_direction=”left” hide_on_mobile=”no” center_content=”no” min_height=”none” align_self=”flex-start” border_sizes_undefined=”” first=”true” last=”true” hover_type=”none” link=”” border_position=”all”][fusion_text columns=”” column_min_width=”” column_spacing=”” rule_style=”default” rule_size=”” rule_color=”” content_alignment_medium=”” content_alignment_small=”” content_alignment=”” hide_on_mobile=”small-visibility,medium-visibility,large-visibility” sticky_display=”normal,sticky” class=”” id=”” font_size=”” fusion_font_family_text_font=”” fusion_font_variant_text_font=”” line_height=”” letter_spacing=”” text_color=”” animation_type=”” animation_direction=”left” animation_speed=”0.3″ animation_offset=””]
앞서 진행한 테마 설치방법은 워드프레스 알림판의 테마 페이지를 통해 진행해봤는데요. 이번 강좌에서는 별도로 다운 받은 테마 파일을 설치해보도록 하겠습니다.
일반적으로 테마 파일은 테마포레스트(Themeforest, http://www.themeforest.net)과 같은 유료 사이트에서 구매하실 수도 있으며, 무료 테마를 배포하는 사이트들에서도 구하실 수 있습니다.
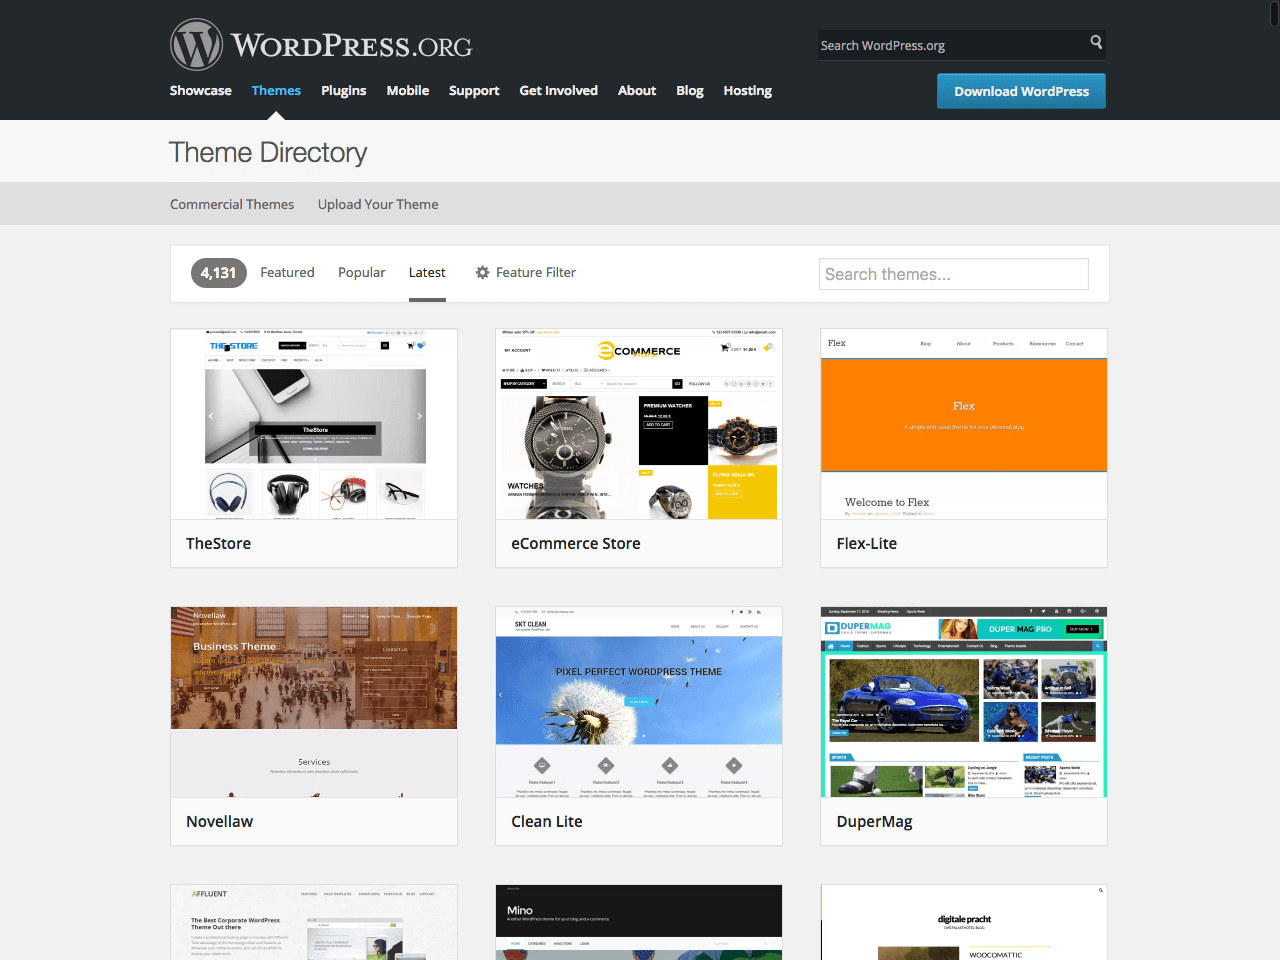
이번 강좌를 위해서 워드프레스 사이트내에 있는 테마소개 페이지로 들어가보겠습니다. 꼭 워드프레스 사이트에서만 테마를 구하실 수 있는 부분은 아니니 구글링을 통해 다양한 테마 파일을 구하실 수도 있습니다.
- 워드프레스 테마 페이지 바로가기 : https://wordpress.org/themes/
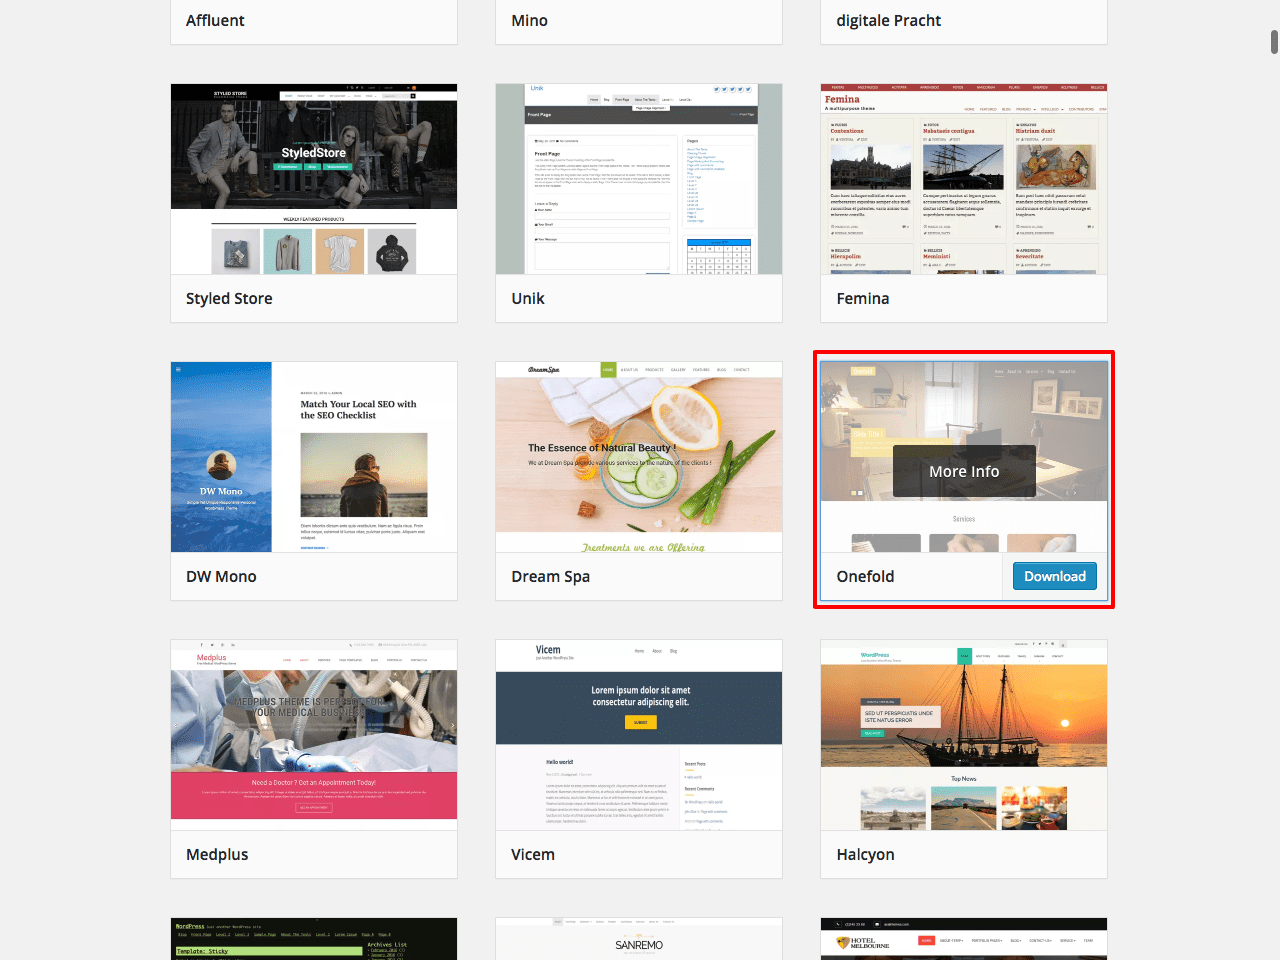
사이트 내의 다양한 테마들 중에서 한 테마를 선택해 보겠습니다. 일단 강좌를 위해서 Onefold테마를 선택해보겠습니다.
원하는 테마를 선택하시면 Download버튼을 눌러 원하시는 곳에 저장합니다. 다운로드를 받으신 후 압축을 푸실 필요가 없습니다. zip파일 그대로를 업로드하시면 됩니다.
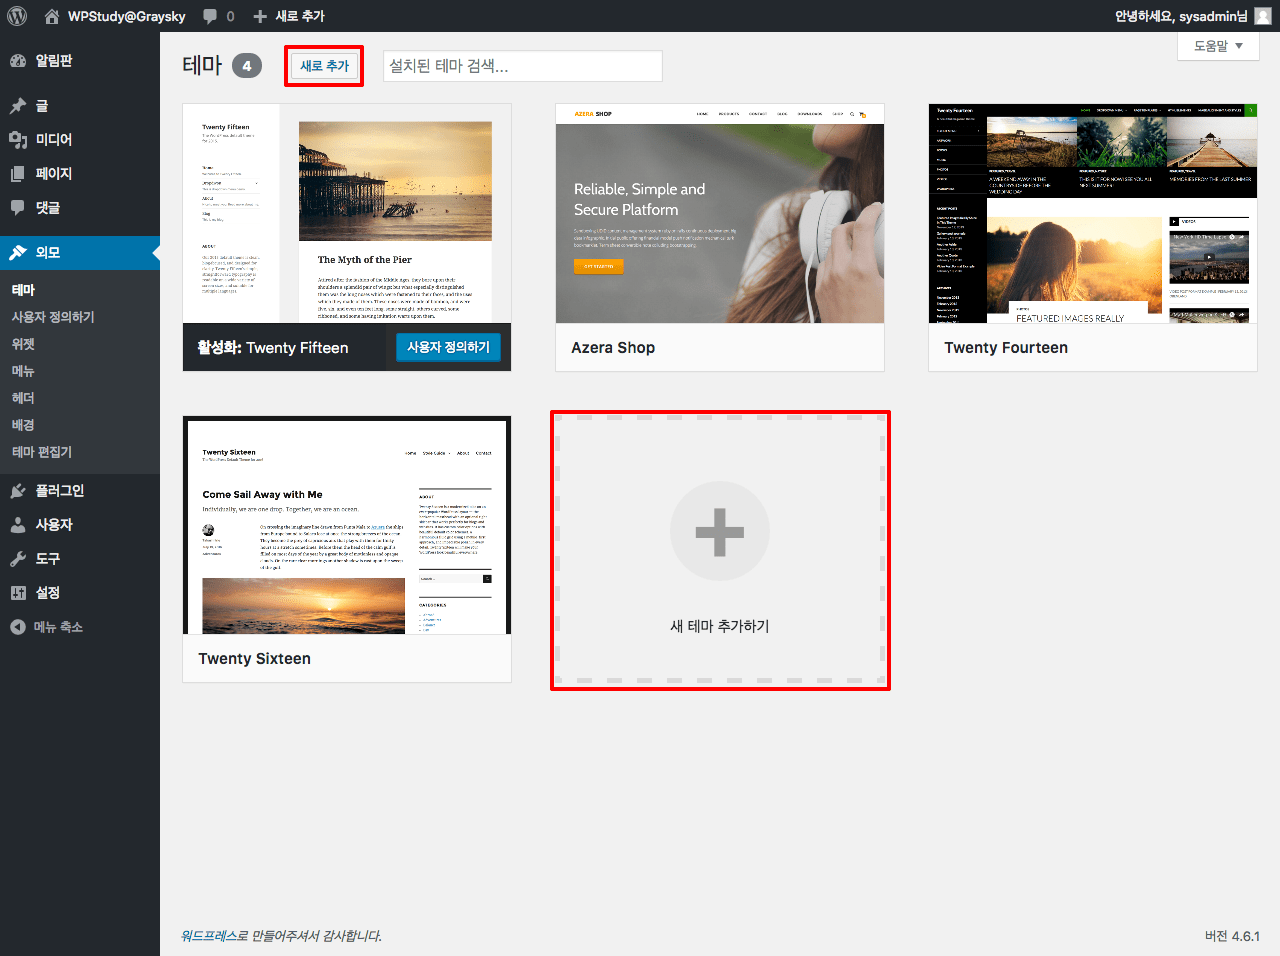
테마를 추가하기 위해 워드프레스 알림판(Dashboard)에 접속합니다. [외모]-[테마]로 이동해서 [새 테마 추가하기] 를 선택합니다.
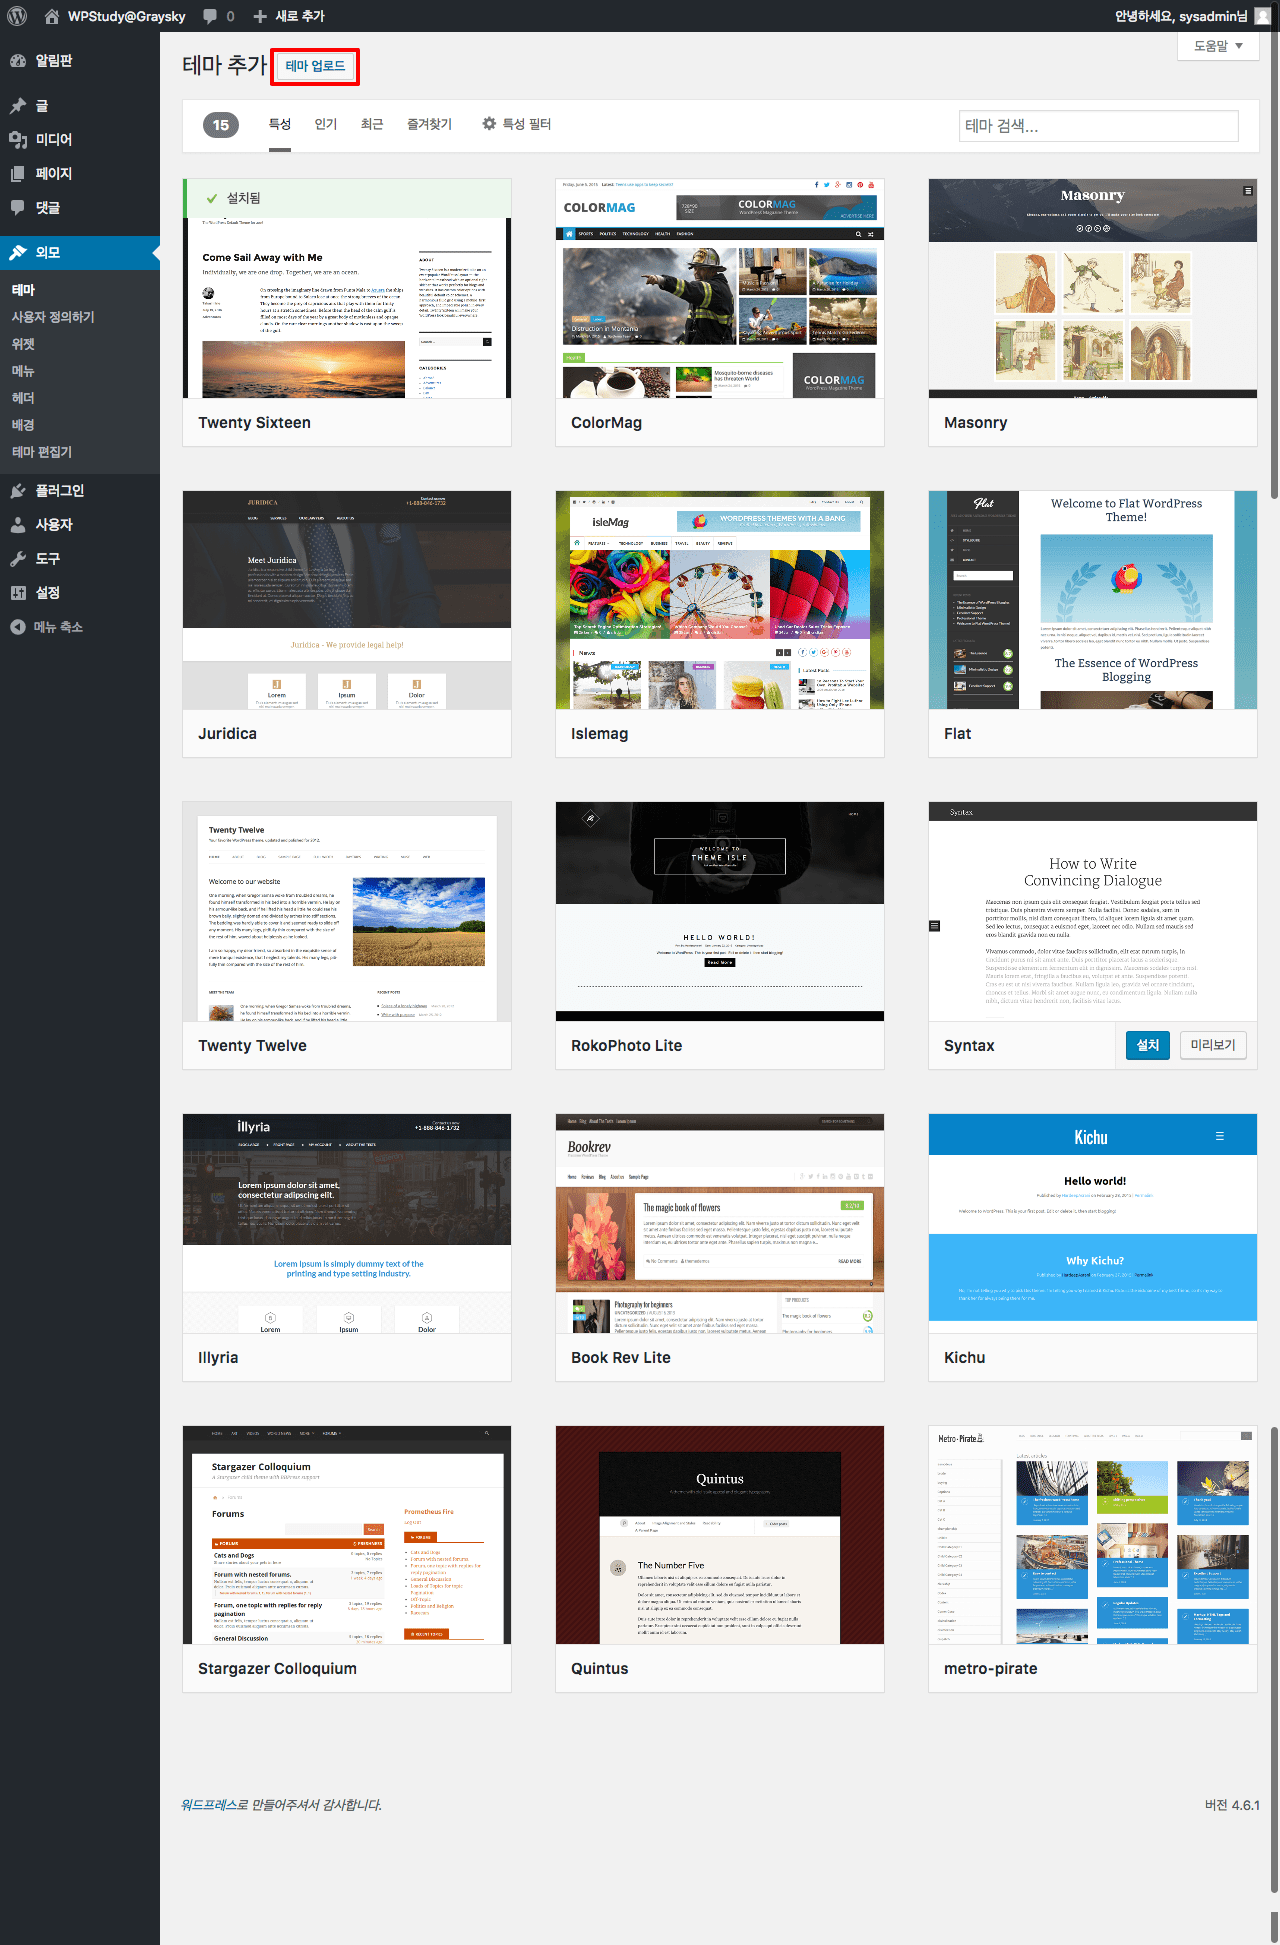
화면 상단의 [테마 업로드]를 선택합니다.

등록할 수 있는 파일은 zip파일입니다. [파일선택]을 눌러줍니다.
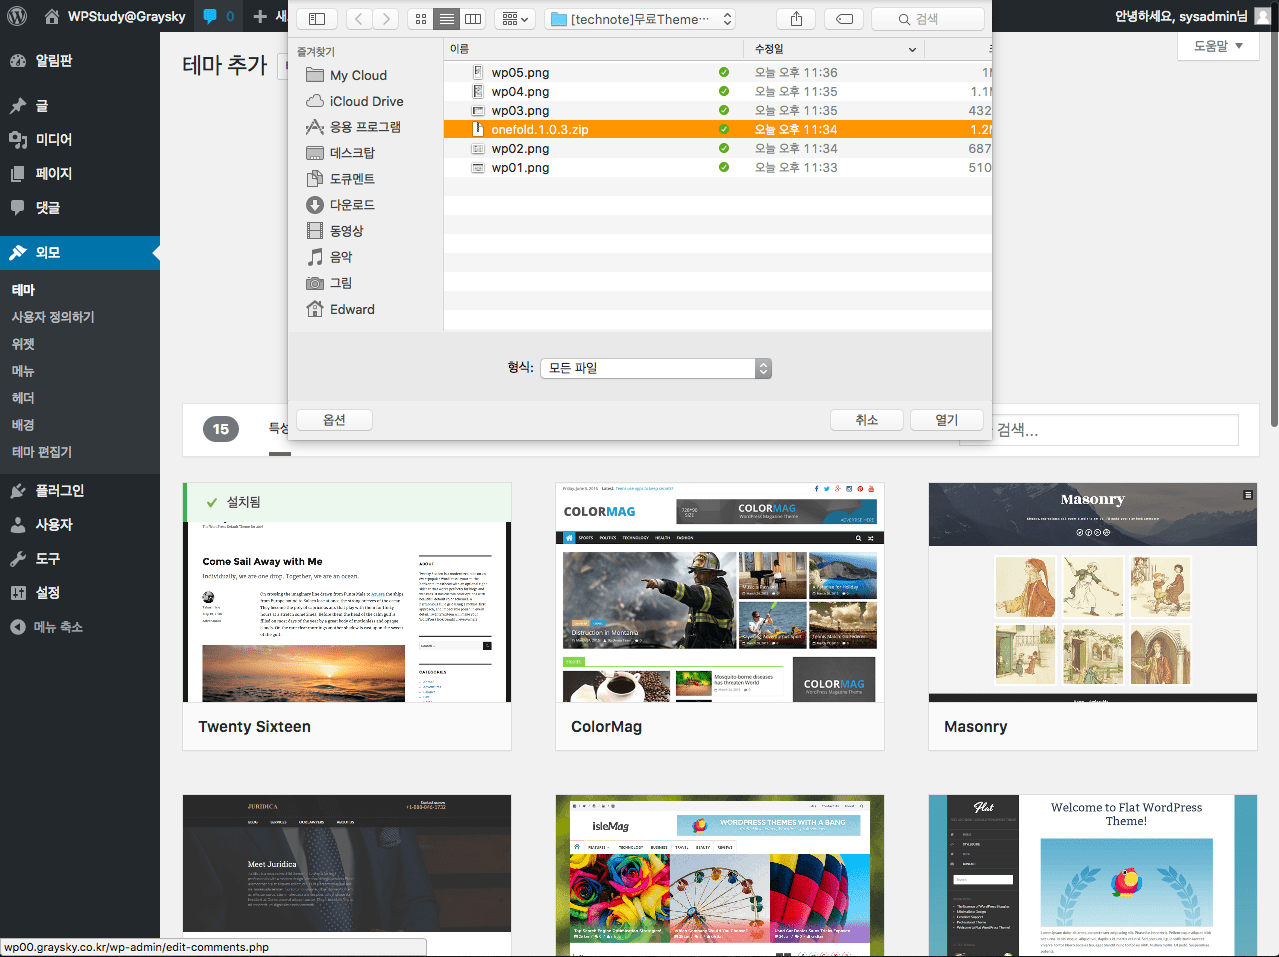
다운 받아뒀던 테마.zip파일을 선택해줍니다.
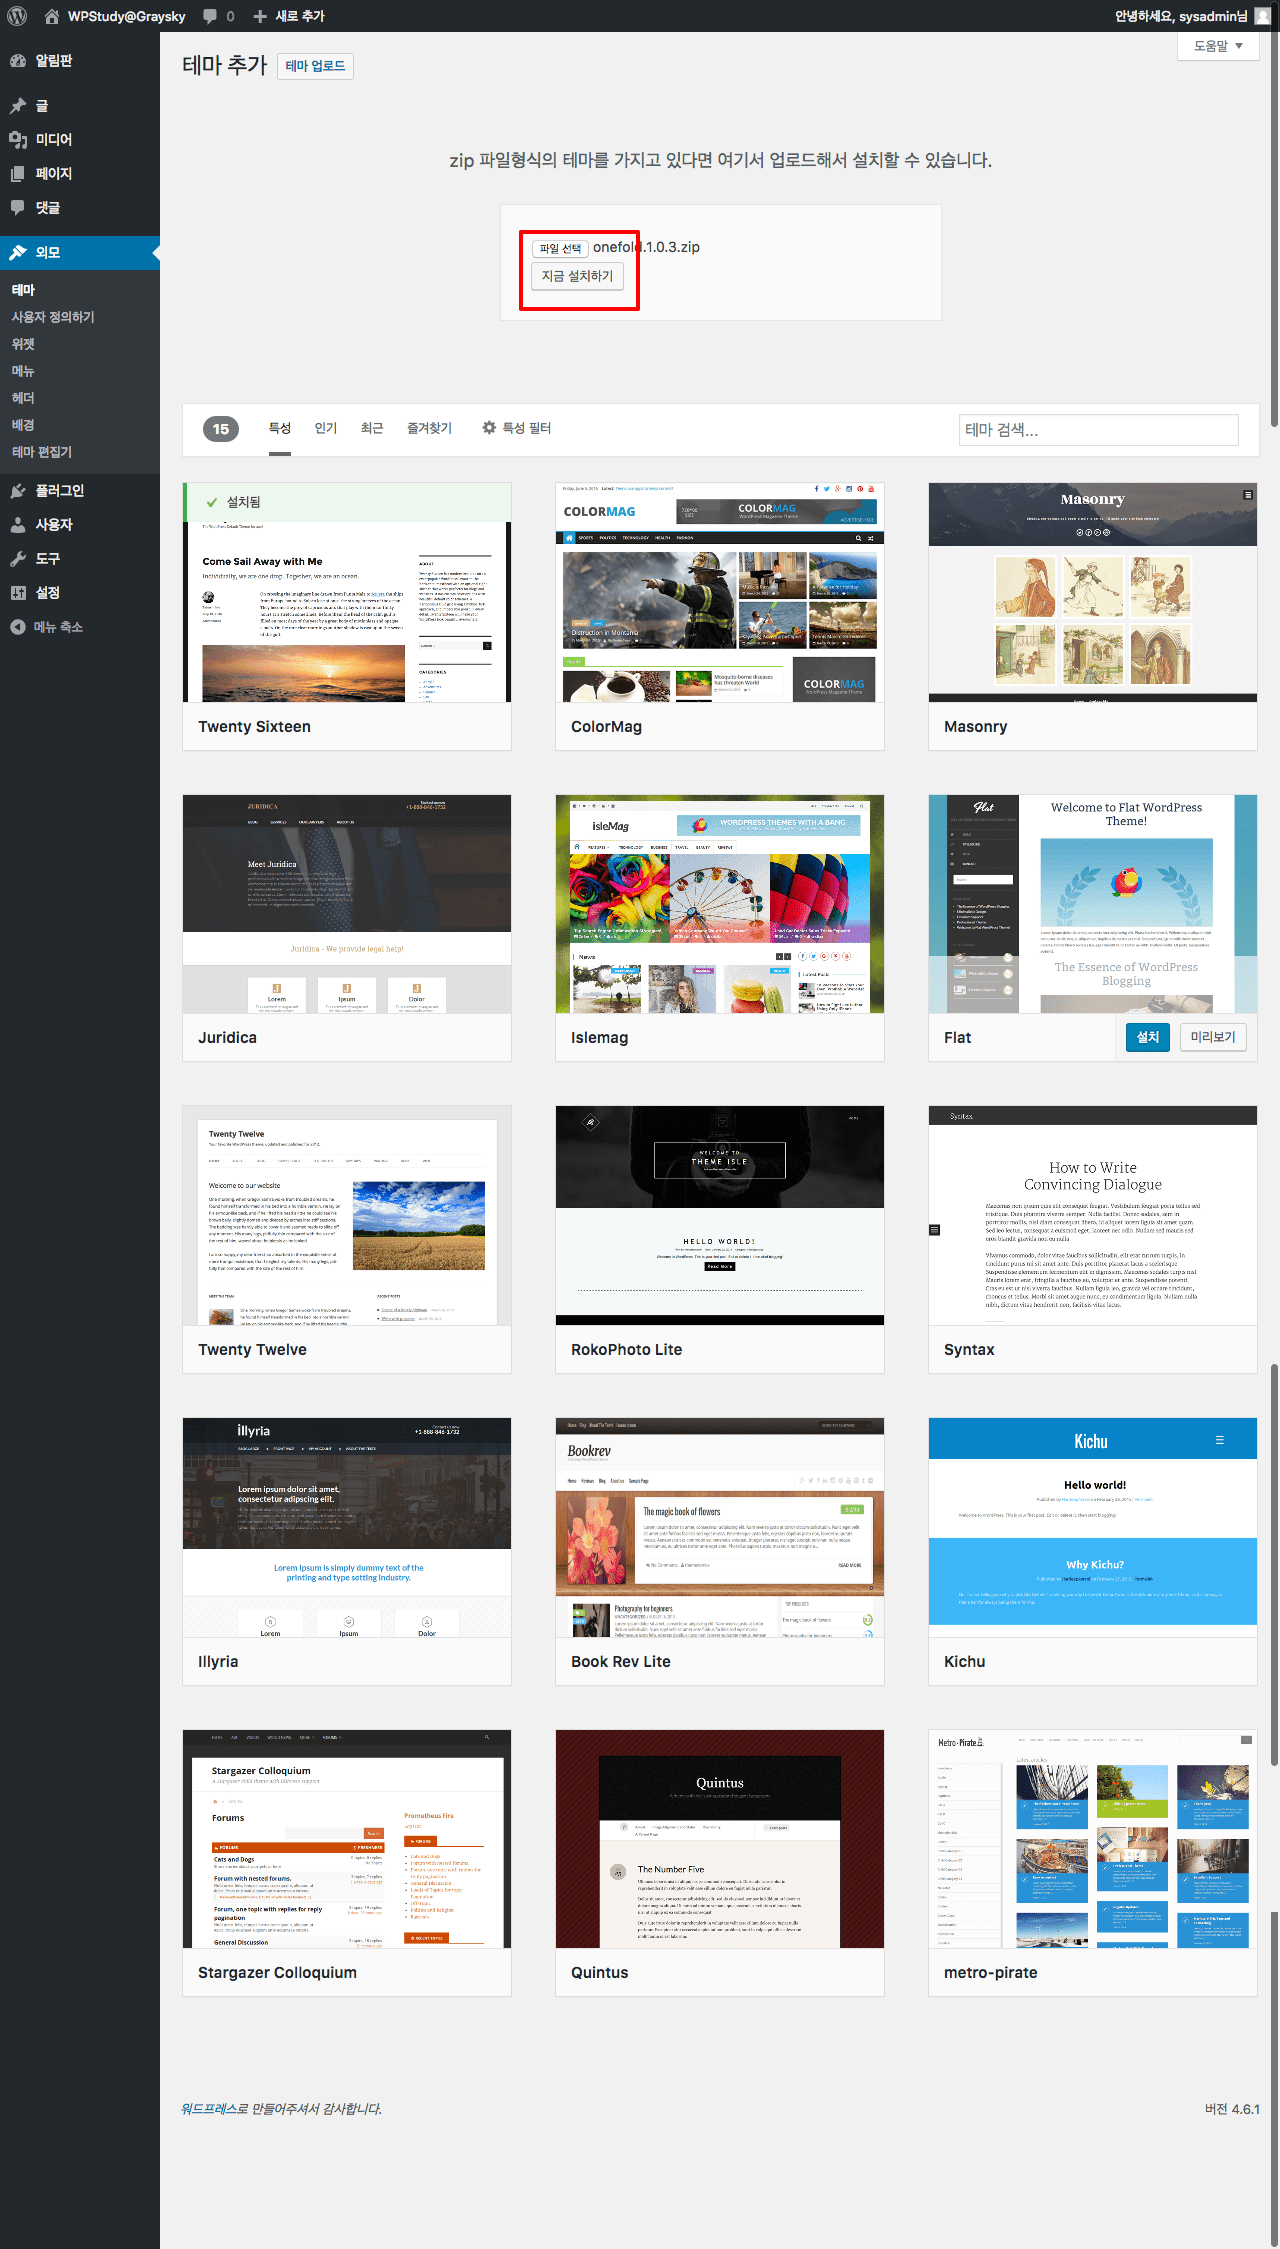
파일 선택이 끝나면 파일명을 확인하시고, [지금설치하기]를 선택합니다.
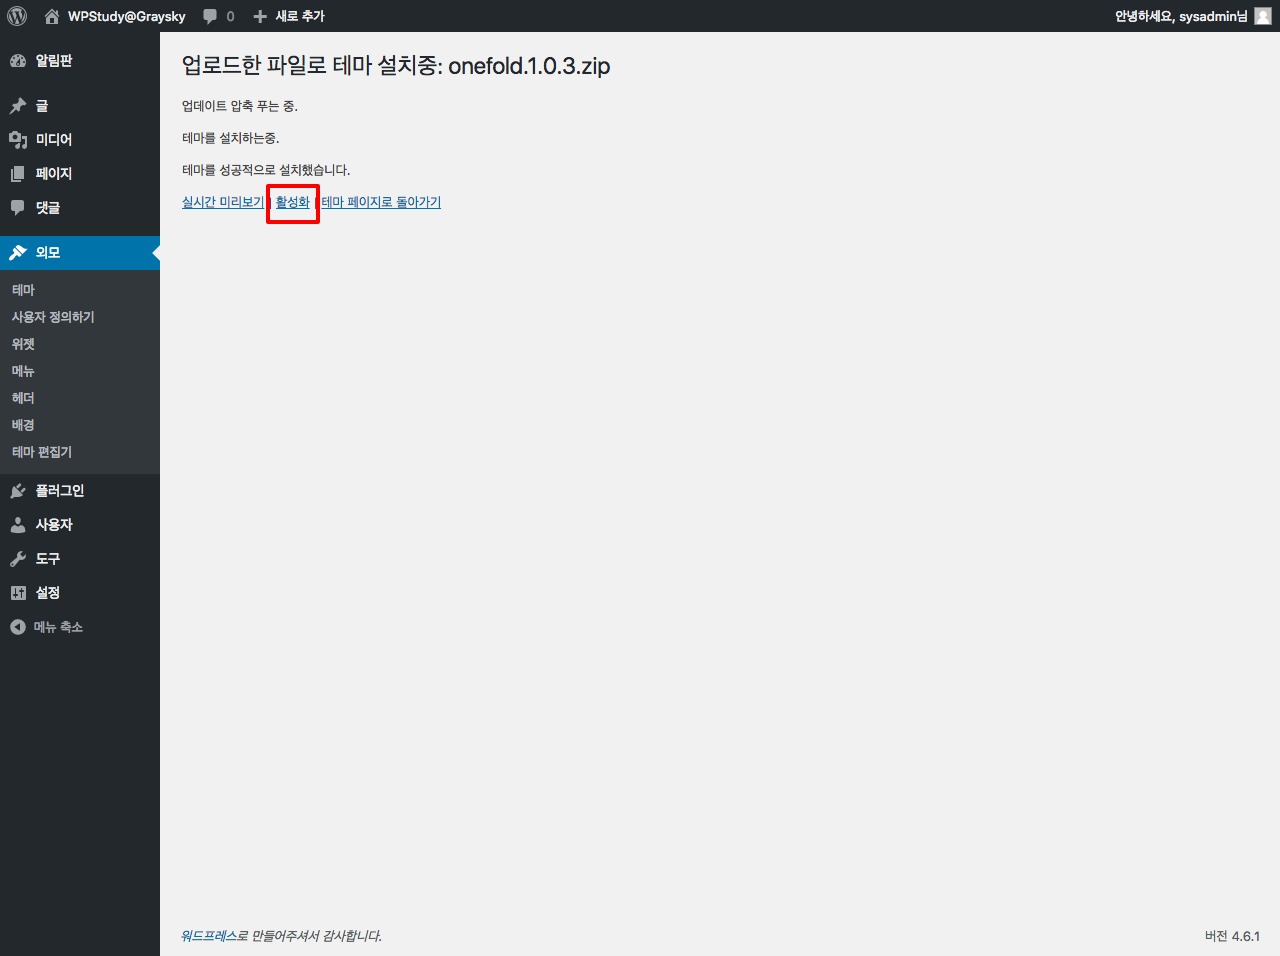
설치에는 속도와 파일용량에 따라 10초 이내에서 최대 1~3분 정도 걸립니다. 설치가 끝나면 다음과 같이 [실시간 미리보기], [활성화] , [테마 페이지로 돌아가기]를 선택할 수 있는 메뉴가 나옵니다.
설치한 테마를 적용하기 위해 [활성화]를 선택합니다.
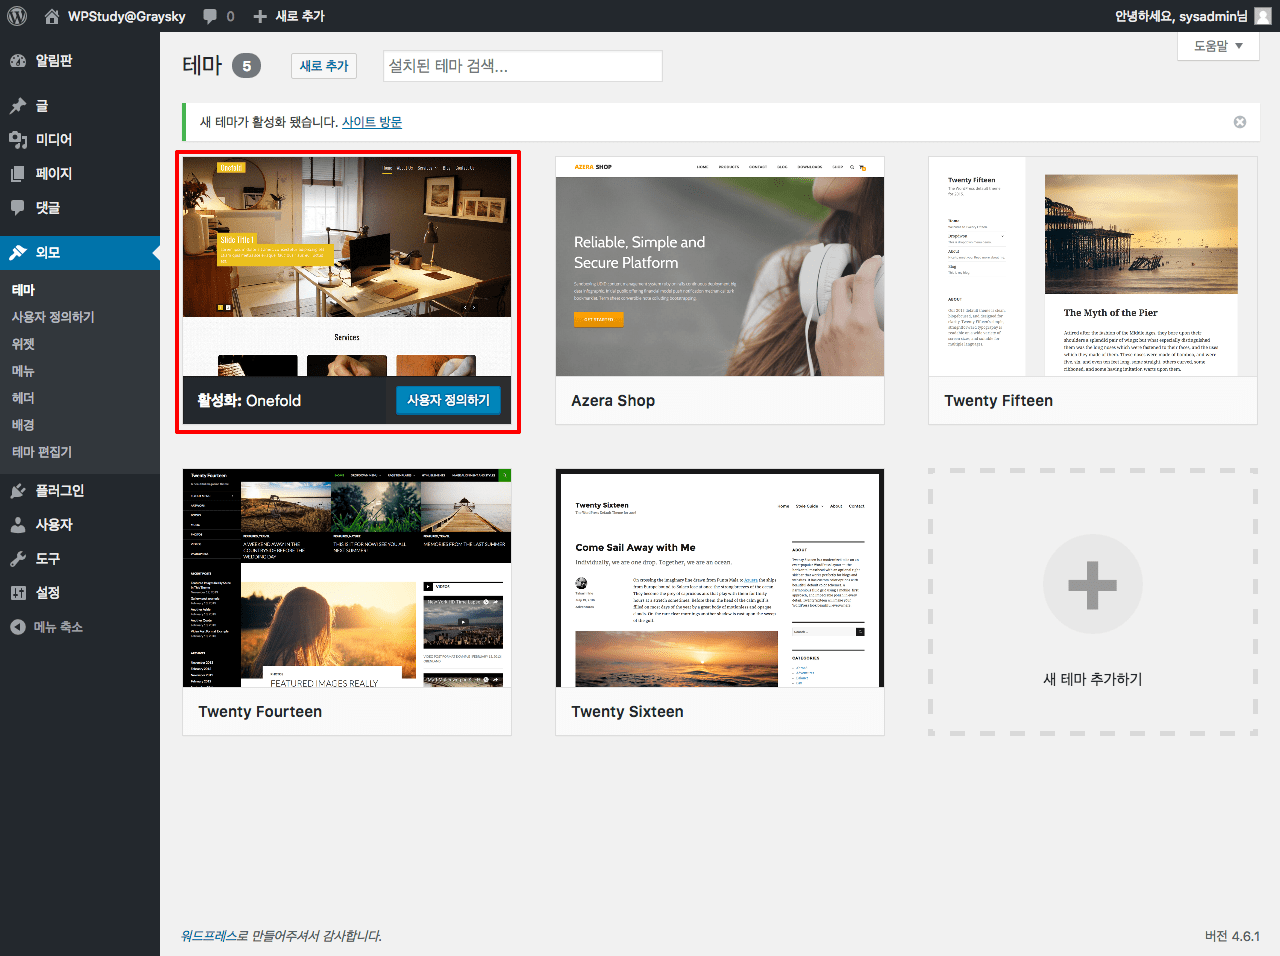
설치한 테마가 활성화 되었습니다. [사용자 정의하기] 를 통해 테마의 여러 설정을 진행할 수 있으며, 필요에 따라 테마에 필수 플러그인을 설치할 수 있습니다.
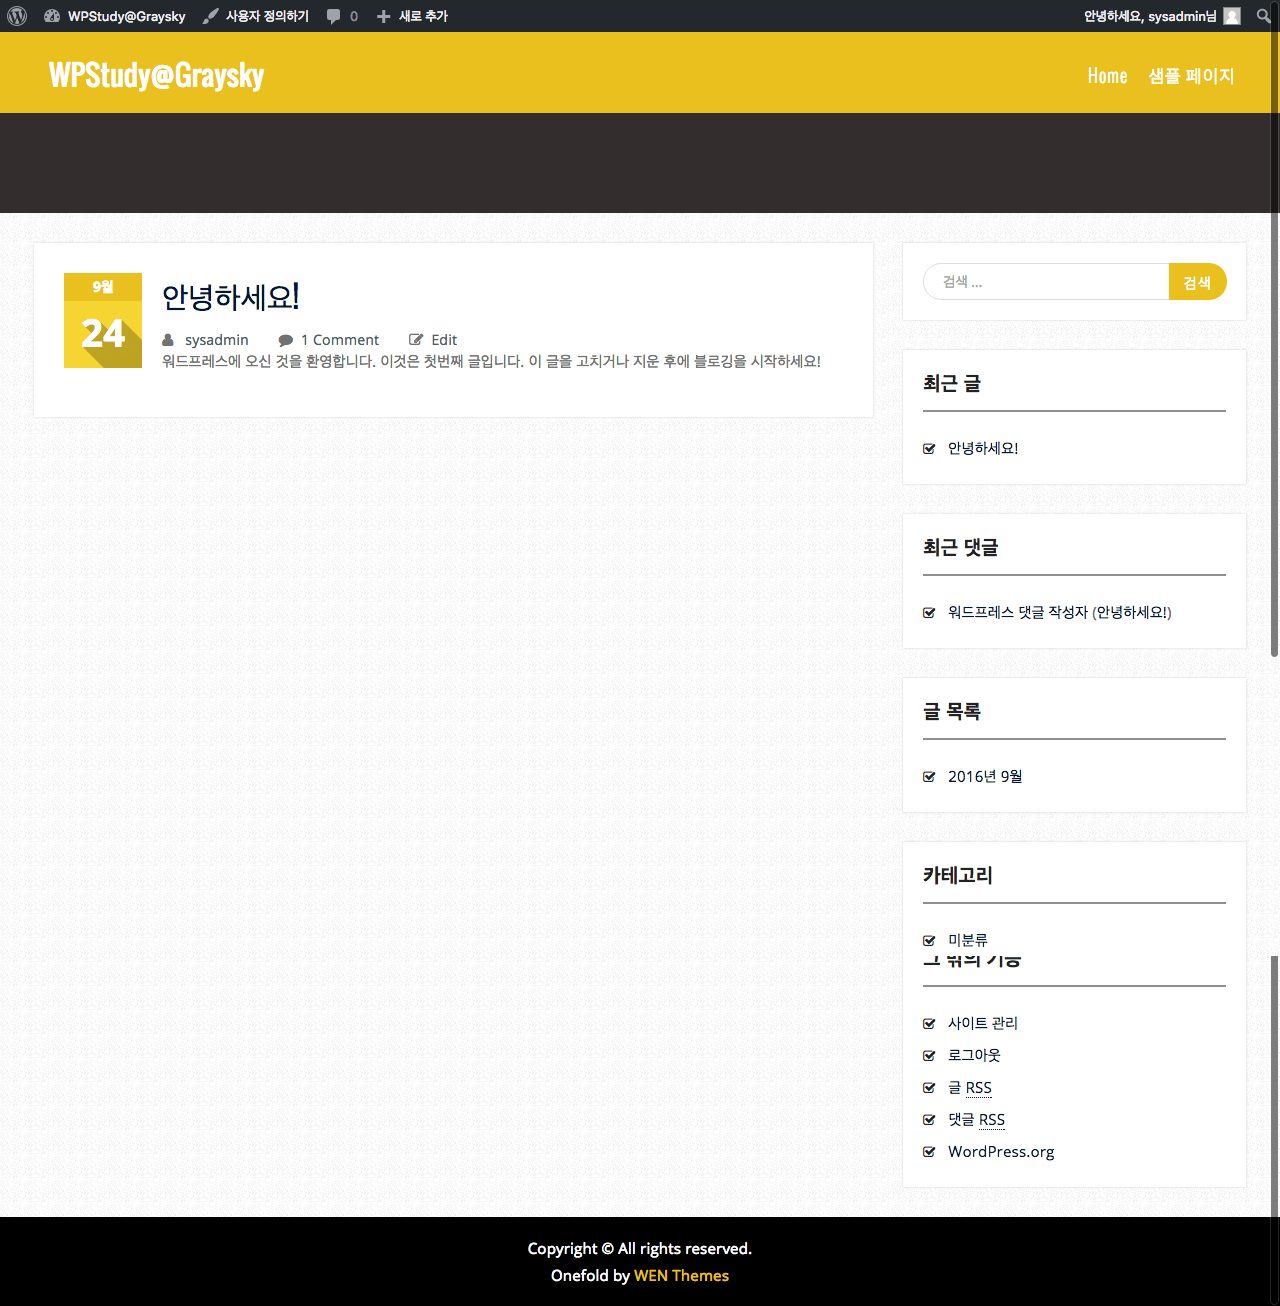
실제 사이트에 접속해보시면 테마가 적용된 사이트를 확인 할 수 있습니다.
이전 강좌에서 설명 드렸던 것처럼 테마를 적용한다고 해서 테마 설치 화면처럼 바로 보여지진 않습니다. 테마의 설정과 페이지 생성 등을 통해 비슷하게 만드실 수 있습니다.
테마를 활용해서 디자인을 꾸미는 강좌는 조만간 올릴 수 있도록 하겠습니다.
지금까지 두 강에 걸쳐 워드프레스 테마설치에 대해 알아보았습니다.
다음 강좌에서는 테마포레스트에서 유료 테마를 다운 받아 설치하는 강좌를 올리도록 하겠습니다.
함께해주셔서 감사합니다.
Technote@흐린하늘 | technote@graysky (http://technote.graysky.co.kr)
[/fusion_text][/fusion_builder_column][/fusion_builder_row][/fusion_builder_container]
